Character selection & Input!
For Part 3 of this tutorial we will be diving into selecting the character we want to use from our spritesheet and the creation of our Input class.
I will start picking up the pace of explaining the code as we will soon be diving into a lot more code and it will help me if I explain a little quicker. Feel free to reach out to me on Discord if you need further explanations.
Character selection
So we need to select the character we want to use out of the atlas we previously rendered to the screen.
To do this we will use a different override for the Draw() Method. Specifically we will use the Draw(Texture2D texture, Vector2 position, Rectangle rectangle, Color color)
Rectangle? Whats that?
The Rectangle parameter we will use is specifically defined as the source rectangle. There is another rectanlge called the destination rectangle but we will not worry about that now. So the source rectangle will define a rectangle on our Texture2D atlas and render just what is inside that source rectangle.
So we will define a rectangle that takes in 4 parameters. The position x & y on our Texture2D and the width and height we want to render.
Reference the image below - our atlas is evenly divided into 24x24 for each sprite as shown with the grid
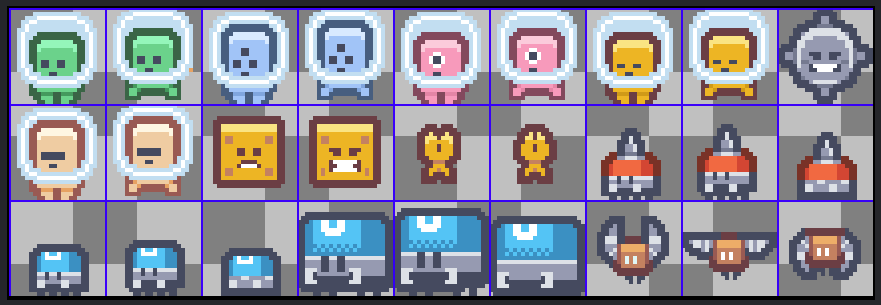
So lets say we want the red character for example. We need to find the X & Y value of the top left corner of that characters square on the grid.

This is the top left of the red characters square. So we can just use our art app to see what the X and Y value is: 96, 0 If you dont want to open an art app to see the exact value, since we know everything is spaced 24x24 we can just do some simple math: 24*4 & 24*0 to get 96 & 0
Now that we have the X & Y 96, 0 we just need the width and height. Which we already know is 24x24. Perfect!
Then you would just fill in the parameters of the Rectangle with these values.
But for this tutorial we will use the green character in the first 2 positions. so we will start with these values for our Rectangle: X & Y: 0, 0 and Width & Height: 24, 24.
Okay lets create our variables:
underneath our _characterAtlas variable we will create the following:
    private Texture2D _characterAtlas;

    #region player

    private Rectangle _characterRect = new Rectangle(0,0,24,24); //
    private Vector2 _playerPosition = new Vector2(200, 200);

    #endregion
The region is just for cleaniness - we will be moving everything to a Player class in an upcoming part.
Now to just render this we will update our Draw() call to the following:
_spriteBatch.Draw(_characterAtlas, _playerPosition, _characterRect, Color.White);
You should now only see the character instead of the whole atlas! But it is still very very small. so we will quickly fix this now.
Sizing up the character
For now for simplicity sake we will quickly adjust the players size. But this will soon be changed in an upcoming part so that everything will be sized up by default.
To do this is quite simple. We will just use the Scale parameter in the Draw() call. Though there are a couple other arguments aswell.
_spriteBatch.Draw(_characterAtlas, _playerPosition, _characterRect, Color.White, 0f, Vector2.Zero, 2.5f, SpriteEffects.None, 0f);
Updating our draw call to this line here will make the player 2.5 times bigger. the parameters of this override are as follows:
Draw(Texture2D texture, Vector2 position, Rectangle sourceRectangle, Color color, float rotation, Vector2 origin, float scale, SpriteEffects spriteEffects, float layerDepth)
We will set the roation to 0f, origin to Vector2.Zero, Scale to 2.5f, SpriteEffects to SpriteEffects.None, and layerDepth to 0f. Most of these are self explanitory but we will go over them when we use them.
You should now see the character and he’s bigger now! WooHoo! Now lets make him move!
Moving the character
To begin moving the character we need to poll for input from our game. To do so we will create a seperate Input class.
Create the following folder and file structure:
└── 📁Src
    └── 📁Util
        └── Input.cs
Lets create our class! start with the basic outline of the class:
using System;
using System.Linq;
using Microsoft.Xna.Framework;
using Microsoft.Xna.Framework.Input;

namespace PixelPlatformer.Util;

public static class Input {

}
We will create this class in the namespace namespace PixelPlatformer.Util
The variables we need for this class are the following:
public static class Input {
    private static KeyboardState _currentKeyboard;
    private static KeyboardState _previousKeyboard;

    private static int[] _keyCodes;
    private static bool[] _keyPress;
    private static bool[] _keyDown;
}
We will need to capture the current frames state and the previous frame state of our keyboard to determine if a key is held vs pressed.
We will create 3 Arrays to hold the data of all our key codes as ints - a bool array for pressed keys and a bool array of held down keys.
We will also need the following functions
public static class Input {
    private static KeyboardState _currentKeyboard;
    private static KeyboardState _previousKeyboard;

    private static int[] _keyCodes;
    private static bool[] _keyPress;
    private static bool[] _keyDown;

    public static void Initialize(){

    }

    public static void Update(GameTime gameTime){

    }

    public static bool IsKeyPressed(Keys key){

    }

    public static bool IsKeyDown(Keys key){

    }
}
These 4 functions are all we need to get basic keyboard input from across our game.
Initializewill initialize our arraysUpdatewill check our keyboard every frame and update its stateIsKeyPressedwill return true or false if a key is just pressedIsKeyDownwill return true or false if a key is held down
Lets start with initialize
    public static void Initialize(){
        _keyCodes = Enum.GetValues(typeof(Keys)).Cast<int>().ToArray();
        _keyPress = new bool[_keyCodes.Length];
        _keyDown = new bool[_keyCodes.Length];
    }
We will initialize our arrays.
_keyCodes = Enum.GetValues(typeof(Keys)).Cast<int>().ToArray();this will convert MonoGames enumKeysto their respective integer values of the enum_keyPress = new bool[_keyCodes.Length];we will initialize_keyPresswith the size of how many keys codes we have_keyDown = new bool[_keyCodes.Length];we will initialize_keyDownwith the size of how many keys codes we have
Update
    public static void Update(GameTime gameTime){
        _currentKeyboard = Keyboard.GetState();

        for(int i = 0; i < _keyCodes.Length; i++){
            Keys key = (Keys)_keyCodes[i];

            if(_currentKeyboard.IsKeyDown(key) && !_previousKeyboard.IsKeyDown(key)){
                _keyPress[i] = true;
            } else {
                _keyPress[i] = false;
            }

            if(_currentKeyboard.IsKeyDown(key) && _previousKeyboard.IsKeyDown(key)){
                _keyDown[i] = true;
            } else {
                _keyDown[i] = false;
            }
        }

        _previousKeyboard = Keyboard.GetState();
    }
Slightly more complex. We will first capture the keyboards state this frame _currentKeyboard = Keyboard.GetState();
We will then loop with the for() loop to check all our keys.
We will now cast the key to the enum value Keys key = (Keys)_keyCodes[i]; so if i = 0 it will set key = the first enum value note that the enum is a list of all keyboard keys which is provided by MonoGame in the using Microsoft.Xna.Framework.Input;
if(_currentKeyboard.IsKeyDown(key) && !_previousKeyboard.IsKeyDown(key)) this if statement will check the current keyabord if KeyIsDown and it will check the previous keyboard if the key was NOT down.
Example: frame 100 of our game running we are not pressing A on the keyboard and then on frame 101 we press A then this if statement will return true.
We then set the key in our _keyPress[] to true using i since i corresponds to the position of the key in our array
Example: _keyPress is filled with our keycodes enum. Lets say our enum has 4 keys W, A, S, D in initialize we are setting _keyPress[] to the size of our enum _keyPress = new bool[_keyCodes.Length]; so since its a bool array our array looks like this [0, 0, 0, 0] with each position representing the enum. so position 0 = W, 1 = A, etc… Looping through the key codes - for this example the enum is W, A, S, D it will loop through them in that order. it will check IsKeyDown(W) and so on throughout our for loop. So lets say we press A it will check IsKeyDown(W) which is false. Next iteration it will check IsKeyDown(A) true! so we set _keyPress[i] = true so our array now looks like [0, 1, 0, 0].
This was a simple example as MonoGame covers all keys there are a lot more keys defined within monogame - but this is the basic idea of what we are implementing.
We will then just check if current state is Down and the previous state is also Down we will the set our _keyDown[] array to true or false
if(_currentKeyboard.IsKeyDown(key) && _previousKeyboard.IsKeyDown(key))
Dont forget to set to false if these conditions do not match the expressions.
And to end the update frame we will set prev keyboard to this frames state so the next frame can use the data for its if checks
_previousKeyboard = Keyboard.GetState();
This is simplier then it looks but trust me it will make using input a lot easier for us!
The next two functions are just to check if the key is pressed or held down
    public static bool IsKeyPressed(Keys key){
        int i = Array.FindIndex(_keyCodes, x => x == (int)key);
        return _keyPress[i];
    }

    public static bool IsKeyDown(Keys key){
        int i = Array.FindIndex(_keyCodes, x => x == (int)key);
        return _keyDown[i];
    }
This is pretty self explanitory - we are just checking if the key we specify is true or false in our 2 bool arrays we made for pressed & down.
Full class:
using System;
using System.Linq;
using Microsoft.Xna.Framework;
using Microsoft.Xna.Framework.Input;

namespace PixelPlatformer.Util;

public static class Input {
    private static KeyboardState _currentKeyboard;
    private static KeyboardState _previousKeyboard;

    private static int[] _keyCodes;
    private static bool[] _keyPress;
    private static bool[] _keyDown;

    public static void Initialize(){
        _keyCodes = Enum.GetValues(typeof(Keys)).Cast<int>().ToArray();
        _keyPress = new bool[_keyCodes.Length];
        _keyDown = new bool[_keyCodes.Length];
    }

    public static void Update(GameTime gameTime){
        _currentKeyboard = Keyboard.GetState();

        for(int i = 0; i < _keyCodes.Length; i++){
            Keys key = (Keys)_keyCodes[i];

            if(_currentKeyboard.IsKeyDown(key) && !_previousKeyboard.IsKeyDown(key)){
                _keyPress[i] = true;
            } else {
                _keyPress[i] = false;
            }

            if(_currentKeyboard.IsKeyDown(key) && _previousKeyboard.IsKeyDown(key)){
                _keyDown[i] = true;
            } else {
                _keyDown[i] = false;
            }
        }

        _previousKeyboard = Keyboard.GetState();
    }

    public static bool IsKeyPressed(Keys key){
        int i = Array.FindIndex(_keyCodes, x => x == (int)key);
        return _keyPress[i];
    }

    public static bool IsKeyDown(Keys key){
        int i = Array.FindIndex(_keyCodes, x => x == (int)key);
        return _keyDown[i];
    }
}
Great! now lets use this class in our main Game class.
DON’T MISS THIS STEP
Don’t forget to call our Initialize() and Update() in our main games Initialize and Update functions
    protected override void Initialize()
    {
        _graphics.PreferredBackBufferWidth = 1280;
        _graphics.PreferredBackBufferHeight = 720;
        _graphics.ApplyChanges();

        Window.AllowUserResizing = false;

        Input.Initialize();

        base.Initialize();
    }

    protected override void Update(GameTime gameTime)
    {
        if (GamePad.GetState(PlayerIndex.One).Buttons.Back == ButtonState.Pressed || Keyboard.GetState().IsKeyDown(Keys.Escape))
            Exit();

        // TODO: Add your update logic here

        Input.Update(gameTime);

        base.Update(gameTime);
    }
Using our new Input class
Lets move the character with our Input class now!
First we will add a couple variables for our players magnitude & speed:
    #region player

    private Rectangle _characterRect = new Rectangle(0,0,24,24); //
    private Vector2 _playerPosition = new Vector2(200, 200);
    private Vector2 _playerMagnitude = Vector2.Zero;
    private float _playerSpeed = 6.0f;

    #endregion
in our update function we will do the following: Make sure to do it AFTER calling Update()
        Input.Update(gameTime);

        _playerMagnitude = Vector2.Zero;

        if(Input.IsKeyDown(Keys.A)){
            _playerMagnitude.X = -1;
        }

        if (Input.IsKeyDown(Keys.D)) {
            _playerMagnitude.X = 1;
        }

        _playerPosition.X += _playerMagnitude.X * _playerSpeed;
_playerMagnitude = Vector2.Zero;set magnitude to Vector2.Zero at the beginning of a frame- If statements to check our keys to see if they are pressed down. and setting the X magnitude to -1 for left and 1 for right
    if(Input.IsKeyDown(Keys.A)){
        _playerMagnitude.X = -1;
    }

    if (Input.IsKeyDown(Keys.D)) {
        _playerMagnitude.X = 1;
    }
_playerPosition.X += _playerMagnitude.X * _playerSpeed;we will then set our positions X by adding the previous X value + the magnitude * by the speed. So if magnitude is -1 when holding left we will move the player-1 * 6.0f = -6.0fso we take the previous X200and add-6.0so we will move to194and positive value for right.
Running the game now we should now be able to move left and right with our player pressing A & D!
Conclusion
If you made it to here CONGRATS! this was a lengthy Part but we made lots of progress! we can now move the player! woohoo!
The next part we will be preparing to adding more movement to our player for falling down with gravity and also flipping the character depending on the direction we press!
Common errors
If your character is not moving when pressing the keys make sure you are calling initialize and update functions. I highly suggest looking through this part a second time to make sure you didnt miss any small details
If you still have any trouble please post in the Github Disscusion or message me privately on discord! tag: ellie.x3